Case study · Conductor Simulator

Conductor Simulator

Learn to conduct — by moving, not reading.

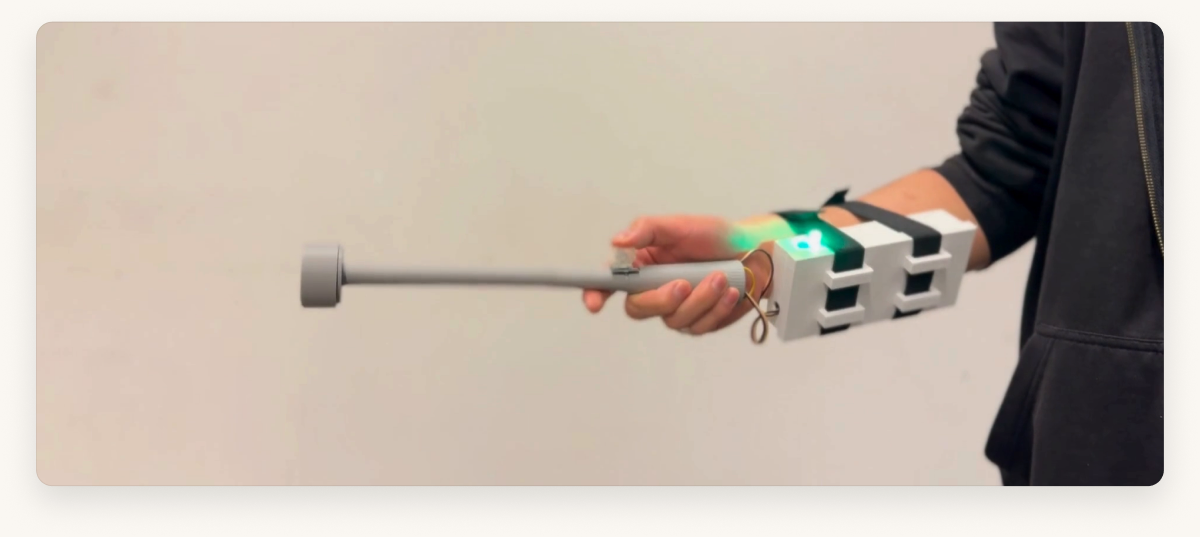
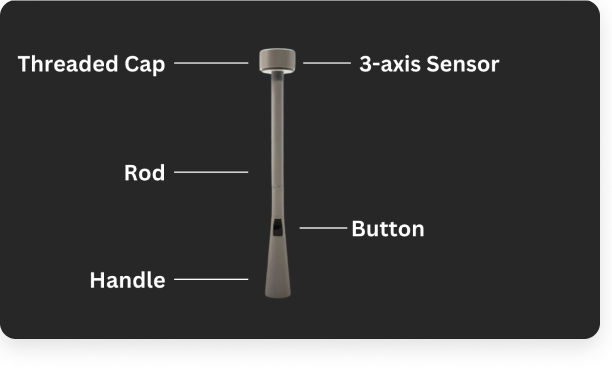
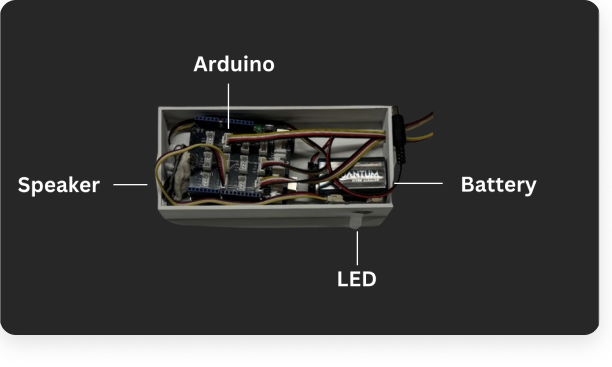
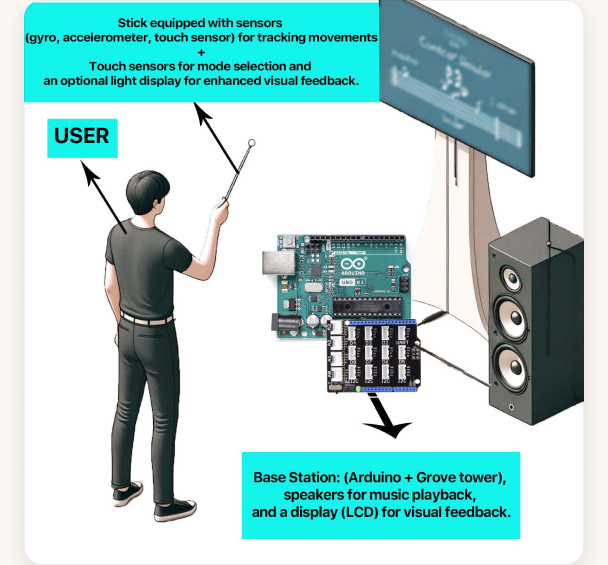
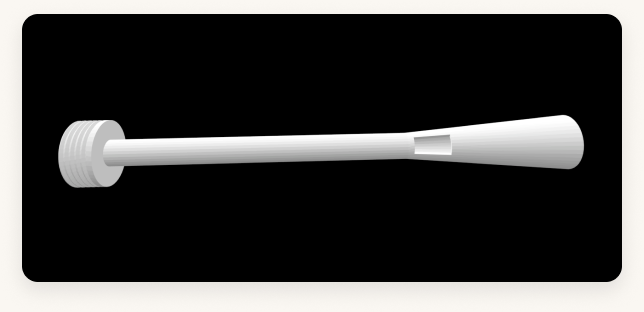
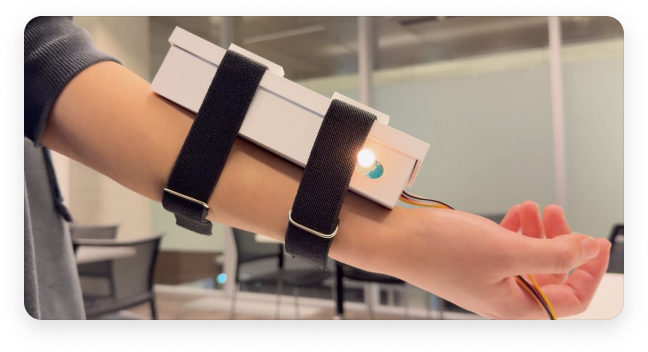
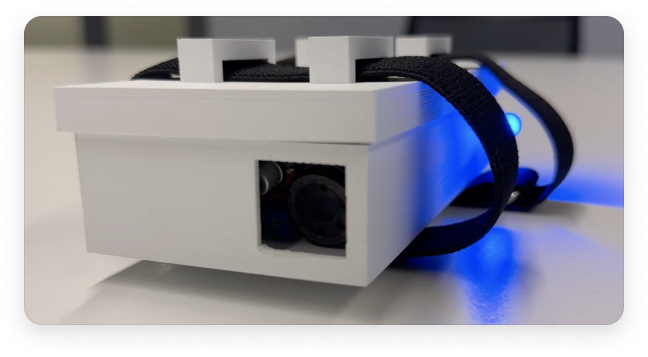
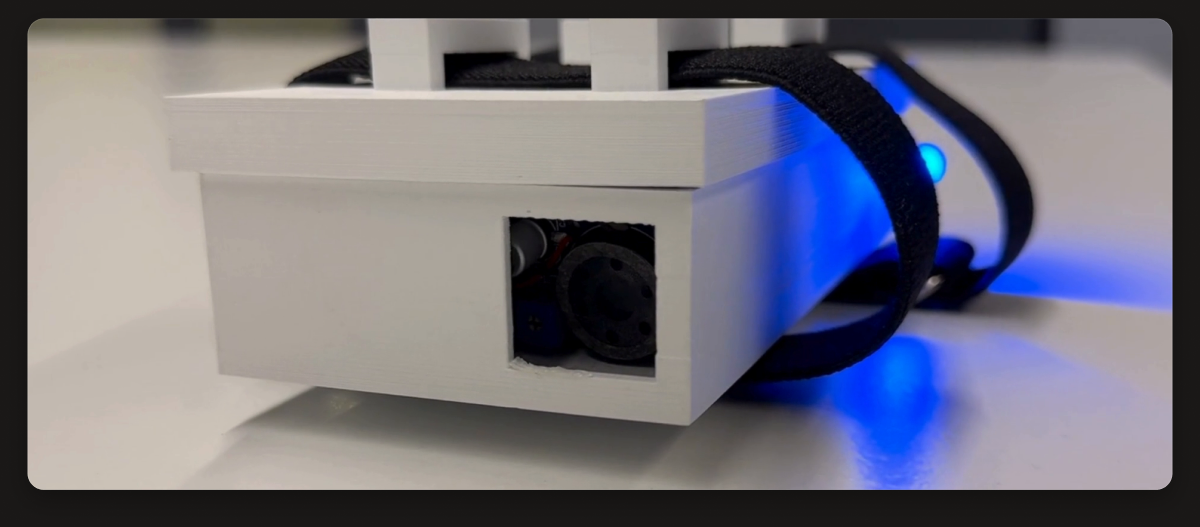
A tangible baton and wristband box that turn hand motion into music in real time — Arduino, a 3-axis accelerometer, and LED + sound feedback. Hand-built and user-tested over five sprints.

The Conductor Simulator in use — a hand sweeps the baton while the wristband box on the forearm glows green
3prototypes tested
5design sprints
11STL models
Watch it in action
The product

Two parts, one gesture.

The Conductor Simulator splits into a baton you move and a box you wear — together they turn motion into music.

The baton — labelled diagram showing the threaded cap, 3-axis sensor, rod, button and handle

The baton

Sweep it like a conductor. A threaded cap holds the 3-axis sensor; a button on the handle changes mode.

The wristband box — labelled photo showing the Arduino, speaker, battery and LED inside

The wristband box

Straps to the forearm so the baton stays light. It carries the Arduino, battery, speaker and LED.

Project overview

Designing an instrument you don’t need training to play.

Problem

Conducting is hard to even try — there’s no low-stakes, hands-on way for a beginner to feel it.

The idea

A sensor baton + wristband box that turn your motion into music, with light and sound feedback.

My role

All 3D/CAD (wand + box) and fabrication, plus the research design & user testing — in a team of 4.

Team & course

Team “No Weaknesses” · Prototyping Physical Interaction.

Tools

Arduino Uno · Grove 3-axis accelerometer · LED · speaker · key switch · battery · Fusion CAD · 3D printing.

Output

A working, user-tested tangible prototype — refined across 3 prototype rounds.

The problem

Conducting is locked behind years of training.

Most people will never stand in front of an orchestra. There’s no casual, hands-on way to feel what leading music is like — so the skill stays abstract, and intimidating, for anyone who didn’t grow up with it.

How might we

How might we let a complete beginner experience conducting — playfully, physically, and with instant feedback?

Framed with the team during discovery, grounded in Human-Centered Design, the Aesthetic-Usability Effect and Tesler’s Law.

Who it’s for

Built for first-time conductors.

Non-musicians and curious beginners — people who’d never get near a podium. We validated the device with participants across a range of musical experience, from none to advanced.

User segment defined through usability testing, not a persona document. Team research personas existed in discovery; this page leads with the people we actually tested.

Design goals

What the device had to get right.

01

Tangible, not on-screen

Motion is the whole interface — no menus to learn before you can play.

02

Instant, legible feedback

You always know, in the moment, whether you’re on the beat.

03

Comfortable for any hand

Ergonomic enough for extended use — including smaller hands.

04

Playful and forgiving

A beginner should feel invited to wave it about, not judged by it.

Interaction model

Motion in, music out.

No screen to read, no notation to learn. You move the baton; the system listens and responds in real time.

1

Hold the baton

grip + ready

2

Move it

your gesture

3

Accelerometer reads

3-axis motion

4

Arduino processes

tempo + logic

5

Sound + LED

music in time

Early concept system diagram — a sensor stick, a base station with Arduino, speakers and an optional display
Early concept system (team). The built prototype delivered LED + sound feedback — the on-screen display shown here stayed a future idea.
Feedback system

A language of light and sound.

With no screen, the device speaks in two channels: an LED state for the eye, and tempo-mapped audio for the ear.

LED states

Green

On-beat / correct

Red

Off / incorrect

Blue

Menu / mode

Yellow

Neutral / ready

Audio + components

Sound

Tempo-mapped playback of well-known pieces, a song-selection menu, and a game mode — the faster you conduct, the faster it plays.

Components

Grove 3-axis accelerometer · key-switch button · LED · speaker · Arduino Uno · battery.

CAD & fabrication

Iterating the wand and casing until they disappeared.

Good hardware gets out of the way. I modelled both the wand and the casing in CAD — a tapered handle, a threaded sensor cap, lighter walls and a wristband mount — iterating each before the final 3D print.

The wand modelled in CAD — a tapered handle with a threaded cap for the sensor
The wand in CAD — a tapered handle and a threaded cap that seats the 3-axis sensor.
Early hand-drawn baton sketches exploring where the sensor should sit
Early baton sketches — finding where the sensor should sit.
The final box modelled in CAD — wristband grooves and cut-outs for the LED and speaker
The final box in CAD — wristband grooves and cut-outs for the LED + speaker.
My contribution

All the 3D — the wand and the box — and the final 3D-printed parts were my part of the team build (3 box + 7 lid iterations; I visited the print lab to check the fit).

Real CAD evidence

11 STL models: 3 box iterations · 7 lid iterations · 1 wand shaft.

This is the strongest proof of my contribution: I owned the wand and casing CAD through repeated physical-fit iterations, then carried those models into the final 3D-printed prototype.

The build

From breadboard to baton.

We wired it on a breadboard, then moved to the 3D-printed wand and box. This is the working prototype we put in front of users — worn on the forearm, hand-soldered, and battery-powered.

The finished device worn on a forearm, the box strapped on with the wand running off it
The finished device, worn — the box straps to the forearm and the wand runs off it.
Inside the box — Arduino, wiring and battery
Inside the box — Arduino, wiring and battery.
The case up close — sensor window and wristband straps
The case up close — sensor window and wristband straps.
Hand-soldered + assembled 3D-printed wand + box Battery-powered — no PC tether Worn on the forearm

A working coursework prototype — not a finished product.

Research & testing

Tested with real hands, three times.

We ran an observational study, four prototype interviews and hands-on usability tests with participants across the musical spectrum — from no musical background to flute and bagpipe players.

The team's 'No Weaknesses' research board on Miro — discovery and synthesis sticky notes
Discovery and synthesis on Miro — the team’s “No Weaknesses” research board.

Observational study

Watching how people naturally moved the baton.

Usability tests

Hands-on tasks with the working prototype.

Nielsen evaluation

Heuristic review against usability principles.

Recorded + transcribed

Sessions captured and analysed as a team.

In the testers’ words

“Don’t make it too heavy — and I couldn’t tell when the button had clicked.”

Tester · no musical background

“The button’s too small and too close, and the wires really restrict the movement.”

Tester · flute player

“Really fun — but it’s fragile, and there are too many wires to hide.”

Tester · bagpipe player, 7 yrs
What we learned

The device fought the hand.

Prototype 1

Naked Arduino

Too heavy on the wrist, and the button broke the flow. Testers asked for a buzz on a wrong move — and a simple manual.

Prototype 2

Wand v1 · no box

Motion felt intuitive, but detection glitched. The small button was badly placed; they wanted LED feedback on movement.

Prototype 3

Wand v2 + box

Handle still hard for small hands, button too small. They loved conducting known songs — and wanted clearer output and volume.

Recurring pain points

Ergonomics for smaller hands Button size & placement Movement-detection false positives Unclear for non-musicians
What we changed

Every change came from a tester.

The redesigned wand handle — labelled: fits average hand size, increased handle height, higher button slot, ergonomic design
The redesigned wand handle — taller, with a higher button slot and a threaded cap, sized for the average hand.
Before

Small button that interrupted movement

After

Larger mechanical key switch with a clear press

Before

Heavy, uncomfortable handle

After

Ergonomic handle with better weight distribution

Before

Thin, loose mount on the arm

After

Wristband + lid grooves so the box sits firm

Before

Vague, unclear feedback

After

A full LED state system (on-beat, off, menu, ready)

Before

Glitchy movement detection

After

Accelerometer fine-tuned for fewer false positives

Before

Confusing controls for beginners

After

Simplified menu and clearer instructions

See it move

Motion becoming music.

The clearest proof is the prototype in motion — the baton sweeping, the sound following, and the LED keeping you honest.

The Conductor Simulator box up close, blue LED lit — a still from the prototype demo
Team of 4 · “No Weaknesses”Prototyping Physical InteractionArduino + accelerometerWorking prototype — not a productNo usage metrics
Real demo evidence

Prototype videos exist: baton movement, sound feedback, and LED response.

Use the demo as proof of physical interaction, not decoration. It shows the thing a screenshot cannot: motion becoming music in real time.

Reflection

What designing an object taught me.

“On screen, you can hide a weak idea behind a nice layout. In your hand, the design either feels right or it doesn’t.”

Owning the 3D taught me that ergonomics is UX — a few millimetres on a handle changed how people felt about the whole thing. The loop of test → change → test was the entire project. Given more time, the team’s vision went further: an on-device display, a metronome and volume controls, wireless, and a multiplayer mode.